Internet Information Server
Normally, you will install an agent in each container that will host SSO partner applications. For example, if you have applications deployed on IIS and Apache, you will have to install an agent in each container. Agents are part of the Service Provider (partner application) runtime environment.
The ISAPI (Internet Server Application Programming Interface) JOSSO agent enables transparent single sign-on capabilities to web assets, such as ASP pages and .Net applications; thus allowing seamless integration without any programmatic intervention. Once installed, the agent will create a local security context that IIS applications can access to obtain information about the current user: identity, properties, roles/groups.
As with every JOSSO agent, the ISAPI agent must rely on a working identity provider for handling the full lifecycle of a single sign-on session, from establishment to disposal. The identity provider role must be realized through a configured JOSSO 2 identity appliance instance.
This tutorial describes the different steps required to install the JOSSO ISAPI agent, and establishing user identity on a sample ASP application using the available SSO security context.
Prerequisites
Before starting, make sure that the following prerequisites are met:
JOSSO 2.4.x instance
Internet Information server (v6, v7 or v7.5)
IIS application resource
Defining Identity Appliance Elements
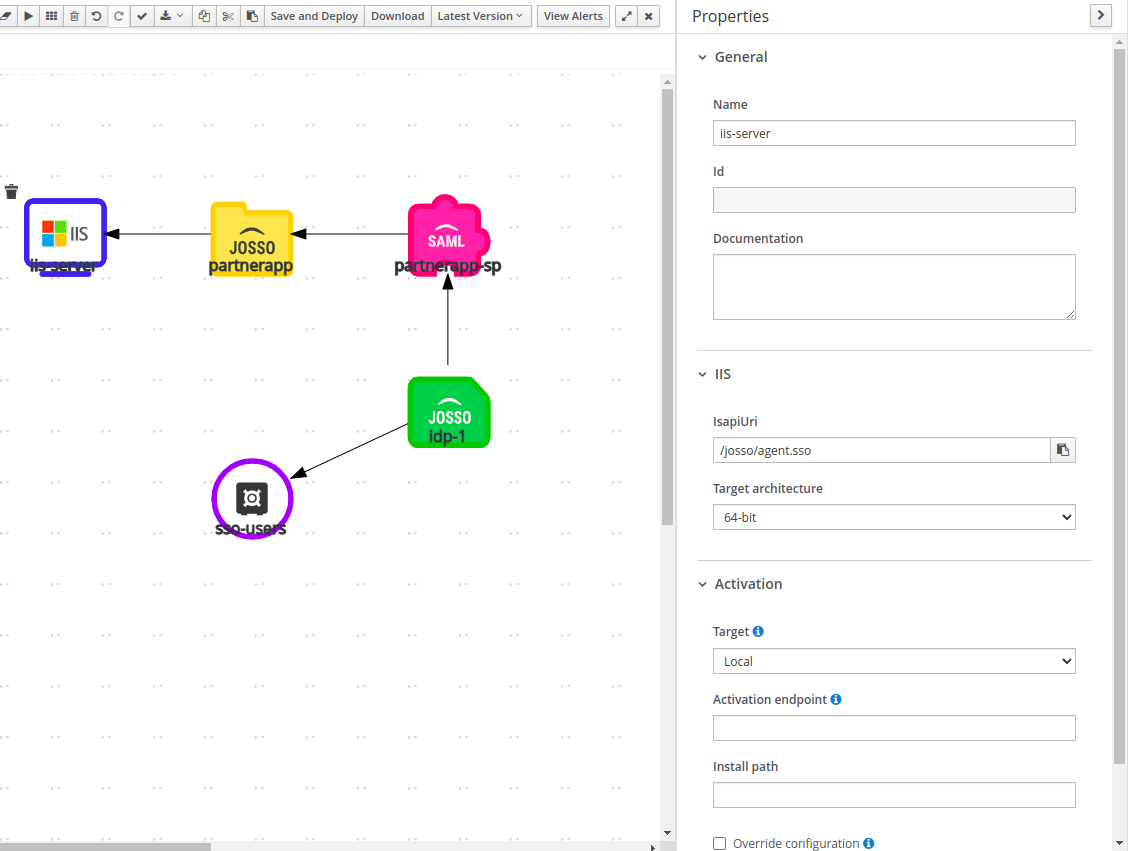
The first step is to define the elements that represent your application and execution environment in the Identity Appliance. The following components must be added to the model:
SAML Service Provider
JOSSO 1 Resource: The resource represents the IIS application, it holds information about the application base URL
Windows IIS Execution Environment: This element represents the IIS server where the application is running. Here you can specify the server architecture, agent install folder, etc.
Once the appliance is compiled, JOSSO will create several configuration resources that will be used to install the agent in the IIS server, based on the different elements' properties.
SAML Service Provider
This element represents SAML 2 services for the application; with JOSSO 2 you can SAML-enable. For details on how to modify the default SAML options refer to the JOSSO 2.4 reference guide. Use a lower-case, meaningful name for the SP. In our example we selected partnerapp-sp.
JOSSO 1 Resource
This element represents a web resource/application that uses a JOSSO agent as an SSO-enabling mechanism. In this case, this represents our ASP application. The key properties are name and location. The name should also be a meaningful value describing the application (i.e. crm). It is also a good practice to use a value similar to the one selected for the service provider (SP). For this tutorial partnerapp was selected. The location property refers to the application base URL (i.e. http://www.mycompany.com). In this tutorial, the application is actually not the entire site, but resources under the /partnerapp path. The configured location is: http://www.mycompany.com:80/partnerapp
Windows IIS Execution Environment
The final element is the execution environment. The Windows IIS Execution Environment has information used to install the JOSSO ISAPI Agent. The key properties are:
| Property | Description |
| ISAPI Agent URI | This is a special path that the agent will use to provide SSO endpoint services. The default value /josso/agent.sso works in most environments and is normally not modified. |
| Target Host | Local when JOSSO and IIS are running on the same OS intance, otherwise Remote is selected. |
| Install Home | Path where the JOSSO ISAPI Agent will be installed. Keep in mind that site will be defined in IIS pointing to a sub-folder of this path. You can set this value to c:\InetPub\josso . |
| Activation Service Endpoint | This is only available when Remote Target Host is selected. It represents the URL where a second JOSSO instance running in the Windows server will be listening for execution environment activation requests. The activation allows JOSSO to perform an initial agent setup on the execution environment. For remote activations a second JOSSO 2 server to perform the local tasks (install files, etc) that the main JOSSO server requires. You don’t need the second JOSSO server running at all times, only when performing the agent activation. You can also remove JOSSO from the server once the activation is completed. The process can also be performed manually, but the execution environment properties configured in the appliance need to reflect the target environment. |
Activating the Execution Environment
Installing Agent Resources
Because we want the tutorial to provide as much information as possible about the IIS integration, the manual activation process will be used. The following resources will be used to configure the agent:
Agent binary file: a Windows Dynamic-lik Library (DLL) for the ISAPI Agent. Choose the version that matches your architecture. The files are provided with JOSSO, and can be found at the following location:
32bit ISAPI Agent: $JOSSO2_HOME/josso/dist/agents/bin/JOSSOIsapiAgent32.dll
64bit ISAPI Agent: $JOSSO2_HOME/josso/dist/agents/bin/JOSSOIsapiAgent64.dll
Agent configuration file: Once your appliance has been compiled, you can select the execution environment element and access the Activation section. Use the Export config button to get a copy of the agent configuration required by your setup.
Windows Registry scripts: These scripts will configure the Windows registry based on your settings. The files are created by JOSSO during the appliance building process. To get the scripts, access the following location:
$JOSSO2_HOME/data/work/maven/projects/<APPLIANCE>/project/idau/src/main/resources/META-INF/spring/<EXEC-ENV>/josso/

josso-agent-eventLog.reg
josso-agent-isapi.reg
Make sure to replace <APPLIANCE> and <EXEC-ENV> with the Identity Appliance and Windows IIS execution environment names.
Once gathered, the resources must be installed in the IIS server using the following structure. Make sure that the base folder matches the one configured in the execution environment (i.e. c:\InetPub\josso).
 C:\InetPub\josso\bin\JOSSOIsapiAgent64.dll
 C:\InetPub\josso\config\josso-agent-config.ini
 C:\InetPub\josso\config\josso-agent-isapi.reg
 C:\InetPub\josso\config\josso-agent-eventLog.reg
 C:\InetPub\josso\log\
Make sure that the IIS system account has the proper permissions over the created folders (i.e. read/write/execute).
Configuring IIS
Windows Registry Configuration
The ISAPI Agent uses Windows registry entries to obtain basic information about agent-specific resources like binary, configuration and log locations, log verbosity level, etc.
JOSSO Agent ISAPI Registry entries:

Windows Registry Editor Version 5.00

[HKEY_LOCAL_MACHINE\SOFTWARE\Atricore]

[HKEY_LOCAL_MACHINE\SOFTWARE\Atricore\JOSSO Isapi Agent]

[HKEY_LOCAL_MACHINE\SOFTWARE\Atricore\JOSSO Isapi Agent\1.8]
"LogLevel"="trace"
"ExtensionUri"="/josso/agent.sso"
"LogFile"="c:\\InetPub\\josos\\log\\josso_isapi.log"
"AgentConfigFile"="c:\\InetPub\\josos\\config\\josso-agent-config.ini"
| Property | Description |
| LogLevel | supported values are: trace (max verbosity), debug, info (recommended for production environments), warn and error. |
| ExtensionUri | value used by JOSSO ISAPI Extension to process SSO specific services. |
| LogFile | Agent log file location. |
| AgentConfigFile | Agent configuration file location. |
The ISAPI Agent also integrates with Windows Event viewer to provide troubleshooting information related to errors occurring before the agent log system is initialized. The following entries register the agent’s DLL as Event Viewer resource messages for errors triggered by the agent. Make sure to select the proper DLL for your architecture.
Windows Registry Editor Version 5.00

[HKEY_LOCAL_MACHINE\SYSTEM\CurrentControlSet\Services\Eventlog\Application\JOSSO Isapi]
"TypesSupported"=dword:00000007
"EventMessageFile"="c:\\InetPub\\josso\\bin\\JOSSOIsapiAgent64.dll"
"CategoryCount"=dword:00000007
"CategoryMessageFile"="c:\\InetPub\\josso\\bin\\JOSSOIsapiAgent64.dll"
Simply double-click each file using an Administrator account and the changes will be added to the system registry.
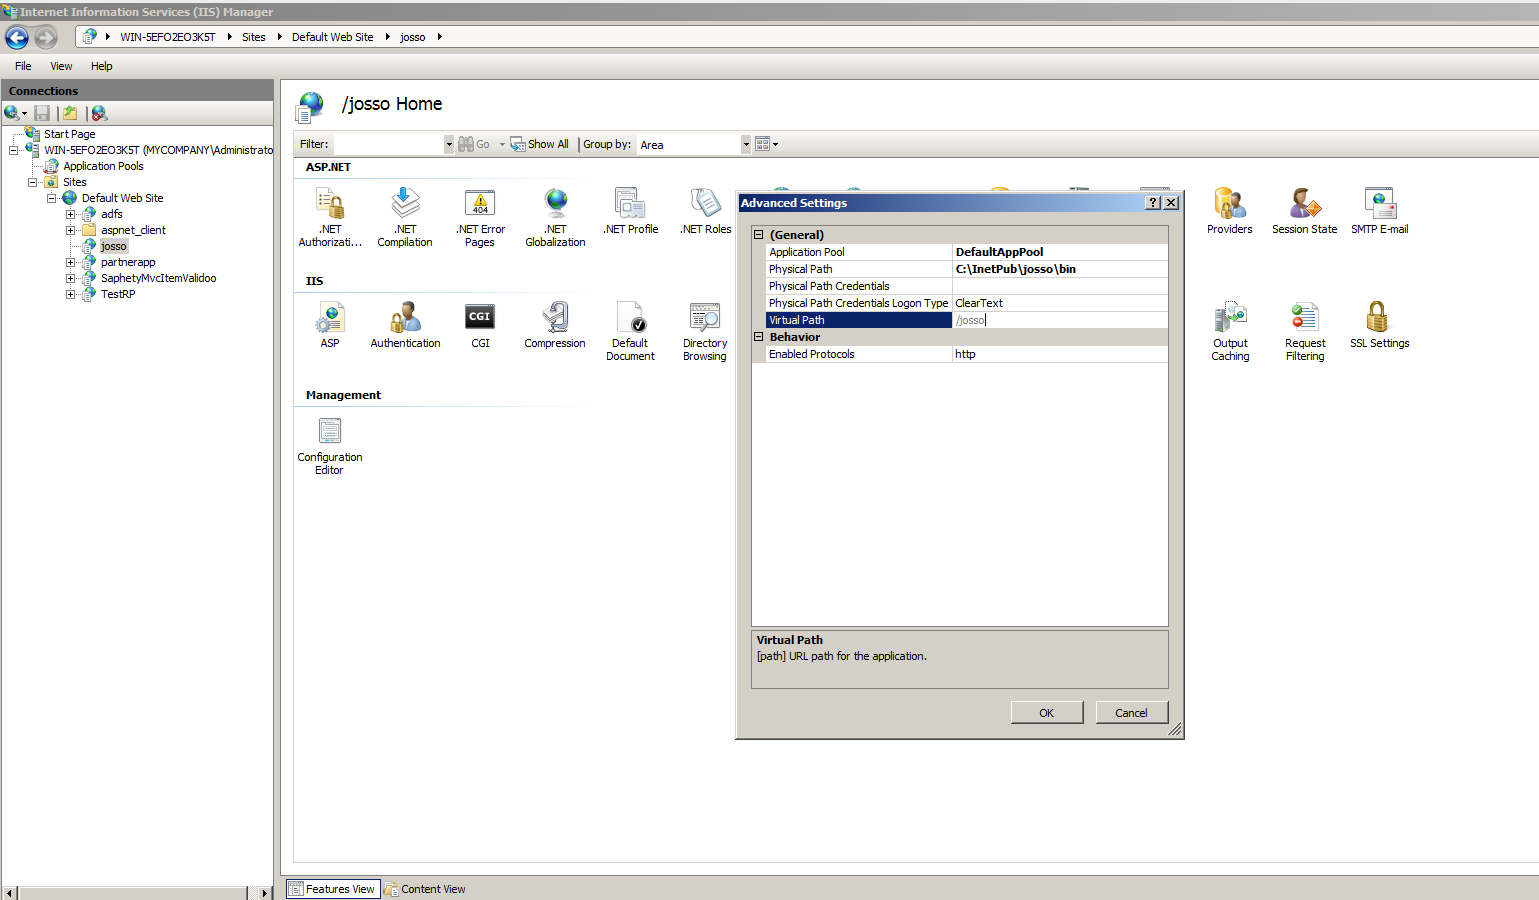
Create JOSSO Agent Application
To enable SSO services on your execution environment, a web application needs to be created for JOSSO. The application physical path must be set to the agent bin folder: c:\InetPub\josso\bin , and the virtual path /josso.
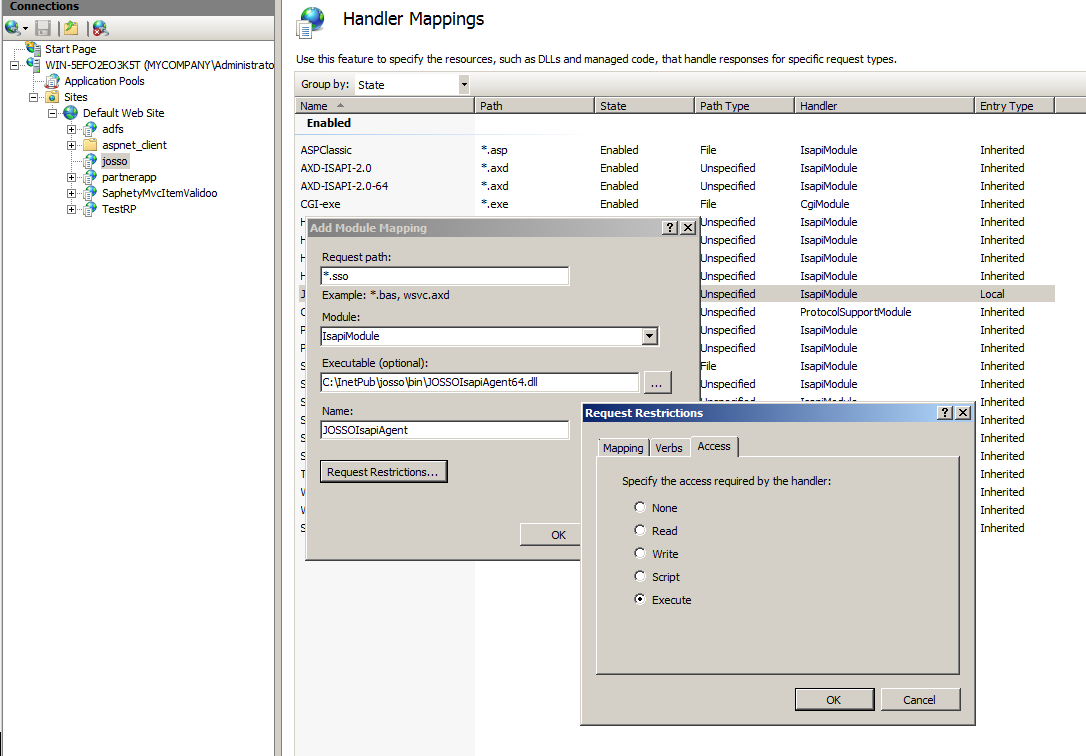
Now that the application is ready, we need to configure a Handler Mapping that relates all requests ending with .sso with the ISAPI agent. Select the created application, and then click the Add Module Mapping… option on the right menu. Use the following values:
| Property | Value | Description |
| Request Path | *.sso | Request path for the module, can also be an expression. All requests ending with .sso will be handled by the agent. |
| Module | IsapiModule | IIS Module type, make sure that IsapiModule is selected. |
| Executable | c:\InetPub\josso\bin\JOSSOIsapiAgent64.dll | Isapi Module binary file |
| Name | JOSSOIsapiAgent | The module mapping name |
| Request Restrictions | Access: Execute | Make sure to enable execute access for the module. |
Set up JOSSO ISAPI Filter
The final step requires you to configure the Agent ISAPI filter to ensure that all requests targeted to your partner application will be protected by the SSO agent. ISAPI filters are configured in IIS at the Site level. Select the site element and then open the ISAPI Filters list. You need to add a new entry for JOSSO. Make sure to agree to the ISAPI extension creation when the filter configuration is confirmed.
| Property | Value | Description |
| ISAPI or CGI Path | c:\InetPub\josso\bin\JOSSOIsapiAgent64.dll | The location of the agent binary file. |
| Description | JOSSOIsapiFilter | Filter configuration description. |
| Allow Extension path to Exectue | Selected | This will allow the filter to run. |

Partner Application Integration
Now that the agent installation is completed, let’s take a look at the application integration.
Accessing the Security Context
You can access user information as Web Server variables; this works for ASP and ASP.NET or any .NET application as well. All JOSSO server variables have the HTTP_JOSSO prefix.
| Variable | Description | Example |
| HTTP_JOSSO_USER | Authenticated user login name | HTTP_JOSSO_USER, value user1 for a user with login user1 |
| HTTP_JOSSO_USER_PROPERTY_<NAME> | Represents a user property | HTTP_JOSSO_USER_PROPERTY_EMAIL, value user1@josso.org for a property email: user1@josso.org |
| HTTP_JOSSO_ROLE_<NAME> | Represents a user role | HTTP_JOSSO_ROLE_ROLE1, value role1 for user with role role1 |
| HTTP_JOSSO_ORIGINAL_RESOURCE_URL | the protected resource URL that was originally requested | http://www.mycompany.com/partnerapp/protected/myprotected.asp |
Let’s take a look at a sample ASP page:
<html>

<body>

    <table width="100%" cellpadding="0" cellspacing="0" border="0" >
        <tr>
            <td align="center" class="label">
                <table cellpadding="0" cellspacing="3" border="0" >

                        <tr>
                            <td colspan="2" align="center"><b>Hello, <%=Request.ServerVariables("HTTP_JOSSO_USER") %>!</b></td>
                        </tr>
                    <%^M
                    for each varName in Request.ServerVariables^M
                        If inStr(varName, "HTTP_JOSSO") then^M
                            response.write("<tr><td>" & varName & "<td/><td>"& Request.ServerVariables(varName) &"</td></tr>")^M
                        end if^M
                    next^M
                    %>
                                </table>
                        </td>
                </tr>
        </table>
</body>

</html>
Triggering login and logout explicitly
A partner application can force a user to authenticate by issuing a HTTP redirect to the proper local agent URL. Depending on the URL parameters, applications can start a login, start a passive login, or perform a logout.
The URL is based on the JOSSO Isapi Extension URI; for example, if the host name is www.mycompany.com and the extension URI is /josso/agent.sso, the login URL should be:
| Parameter | Value | Description |
| josso_login | No value required | Triggers a login process, the IdP will try any available authentication mechanism, like basic authentication. |
| josso_login_optional | No value required | Triggers a passive login process, the IdP will use only passive authentication mechanisms (existing session, WIA, etc). Useful to check for the existence of an SSO session. |
| josso_force_authn | true, false | Tells JOSSO that an authentication must be forced for the user, even if a session is active. Useful to request an authentication context with different security constraints. For example, require basic authentication when remember-me has been detected. |
| josso_authn_ctx | SAML 2.0 authentication context | When combined with josso_force_authn, it allows applications to request a specific authentication mechanism. |
| josso_logout | No value required | Triggers the single logout process. |
| josso_partnerapp | SP Name | Tells the agent which application is performing the request. It must match the SAML service provider name (i.e. partnerapp-sp). associated to the IIS partner application. |
Let’s take a look at some samples:
| Intent | Sample URL |
| Login | changeme |
| Force a login, even if session exists, using password | changeme |
| Passive login (no user interaction) | changeme |
| Logout | changeme |
The parameters that specify the type of action to be performed (josso_login, josso_login_optional, josso_logout), are exclusive and cannot be combined in the same request.