Branding
Starting with JOSSO 2.3.0 the branding infrastructure is based on the Apache Wicket web framework: http://wicket.apache.org. This provides a more flexible, and easier to use branding facility as compared with JOSSO 2.2.x. One of the key aspects of the new branding support is that you can define as many configurations as you need, and then reference them from different Identity Appliances; allowing branding reuse across Identity Appliances. Each branding configuration is known as a Branding Plugin or Branding Extension. Like all JOSSO 2 extensions, branding plugins are packaged as OSGi bundles that can be dynamically installed in JOSSO 2. To simplify the installatoin and deployment process, JOSSO provides a Branding Management facility that can be accessed through the web management console (Atricore Console).
About This Tutorial
This tutorial will show how to create your own branding plugin. We will create a branding plugin default project based on our company information. After that we will modify different HTML templates to create a different look and feel. We will then package, install and deploy the plugin using the management console and test it using a sample appliance. The tutorial will provide instructions on how to create, build and deploy your plugin both on Windows and Unix machines.
TIP
Keep in mind that the platform used to create and work on the branding project does NOT need to match the platform used by the JOSSO Server. (You can work on the plugin on your Windows desktop and deploy it on a JOSSO server running on Unix.)
Prerequisites
Before you begin, make sure that you already meet the following requirements:
Java Development Kit 7
JOSSO 2.4.x or above
Sample SSO appliance running
Apache Maven 3.3.x
The Branding Plugin
Create the Branding Plugin Project
JOSSO provides tools that help you create a default branding project based on your organization information. In order to create your project you need to select a project group and name. The group is a name-space in the format of a java package name. In our example we’re using com.mycompany.sso as the group identifier. The name identifies your UI project; in our case we’re using the organization name: mycompany. Keep in mind that you can’t use spaces in either the group or name values.
Let's start by creating a folder where the project will be generated. Open a command line window, create the folder and then run the UI creation script using the selected values for group and name. A folder with the selected name will be created with all the project resources. The script uses JOSSO's maven archetype to create your project instance, so make sure that both Java and Maven are properly configured. For this tutorial the following assumptions are made:
JOSSO 2 is installed at C:\atricore\josso-ee-2.4.0 (windows) and /opt/atricore/josso-ee-2.4.0 (Unix)
The group-id and ui-id to be used are com.mycompany.sso and mycompany
The project will be created in C:\atricore (Windows) and /opt/atricore (Unix)
Let's create the UI project :
In Windows systems:
C:\>cd atricore
C:\atricore> .\josso-ee-2.4.0\bin\tools\create-ui-project.bat com.mycompany.sso mycompany
[INFO] Scanning for projects...
[INFO]
[INFO] ------------------------------------------------------------------------
[INFO] Building Maven Stub Project (No POM) 1
[INFO] ------------------------------------------------------------------------
[INFO]
[INFO] >>> maven-archetype-plugin:2.2:generate (default-cli) @ standalone-pom >>>
[INFO]
[INFO] <<< maven-archetype-plugin:2.2:generate (default-cli) @ standalone-pom <<<
[INFO]
[INFO] --- maven-archetype-plugin:2.2:generate (default-cli) @ standalone-pom ---
[INFO] Generating project in Batch mode
[INFO] Archetype repository missing. Using the one from [org.atricore.josso.archetypes:josso2-ui-archetype:2.4.0-SNAPSHOT] found in catalog local
[INFO] ----------------------------------------------------------------------------
[INFO] Using following parameters for creating project from Archetype: josso2-ui-archetype:2.4.0-SNAPSHOT
[INFO] ----------------------------------------------------------------------------
[INFO] Parameter: groupId, Value: com.mycompany.sso
[INFO] Parameter: artifactId, Value: mycompany
[INFO] Parameter: version, Value: 1.0.0
[INFO] Parameter: package, Value: ${groupId}
[INFO] Parameter: packageInPathFormat, Value: ${groupId}
[INFO] Parameter: uiId, Value: mycompany
Sep 16, 2013 1:20:13 PM org.apache.velocity.runtime.log.JdkLogChute log
INFO: FileResourceLoader : adding path '.'
[INFO] Parameter: package, Value: com.mycompany.sso
[INFO] Parameter: version, Value: 1.0.0
[INFO] Parameter: variant, Value: mycompany
[INFO] Parameter: groupId, Value: com.mycompany.sso
[INFO] Parameter: variantSuffix, Value: _mycompany
[INFO] Parameter: artifactId, Value: mycompany
[INFO] project created from Archetype in dir: C:\atricore\mycompany
[INFO] ------------------------------------------------------------------------
[INFO] BUILD SUCCESS
[INFO] ------------------------------------------------------------------------
[INFO] Total time: 5.255s
[INFO] Finished at: Mon Sep 16 13:20:13 EDT 2013
[INFO] Final Memory: 13M/155M
[INFO] ------------------------------------------------------------------------
C:\atricore
In Unix systems:
    $ cd /opt/atricore
    $ ./josso-ee-2.4.0/bin/tools/create-ui.project.sh com.mycompany.sso mycompany
    [INFO] Scanning for projects...
    [INFO]
    [INFO] ------------------------------------------------------------------------
    [INFO] Building Maven Stub Project (No POM) 1
    [INFO] ------------------------------------------------------------------------
    [INFO]
    [INFO] >>> maven-archetype-plugin:2.2:generate (default-cli) @ standalone-pom >>>
    [INFO]
    [INFO] <<< maven-archetype-plugin:2.2:generate (default-cli) @ standalone-pom <<<
    [INFO]
    [INFO] --- maven-archetype-plugin:2.2:generate (default-cli) @ standalone-pom ---
    [INFO] Generating project in Batch mode
    [INFO] Archetype repository missing. Using the one from [org.atricore.josso.archetypes:josso2-ui-archetype:2.4.0-SNAPSHOT] found in catalog local
    [INFO] ----------------------------------------------------------------------------
    [INFO] Using following parameters for creating project from Archetype: josso2-ui-archetype:2.4.0-SNAPSHOT
    [INFO] ----------------------------------------------------------------------------
    [INFO] Parameter: groupId, Value: com.mycompany.sso
    [INFO] Parameter: artifactId, Value: mycompany
    [INFO] Parameter: version, Value: 1.0.0
    [INFO] Parameter: package, Value: ${groupId}
    [INFO] Parameter: packageInPathFormat, Value: ${groupId}
    [INFO] Parameter: uiId, Value: mycompany
    Sep 16, 2013 1:20:13 PM org.apache.velocity.runtime.log.JdkLogChute log
    INFO: FileResourceLoader : adding path '.'
    [INFO] Parameter: package, Value: com.mycompany.sso
    [INFO] Parameter: version, Value: 1.0.0
    [INFO] Parameter: variant, Value: mycompany
    [INFO] Parameter: groupId, Value: com.mycompany.sso
    [INFO] Parameter: variantSuffix, Value: _mycompany
    [INFO] Parameter: artifactId, Value: mycompany
    [INFO] project created from Archetype in dir: /opt/atricore/mycompany
    [INFO] ------------------------------------------------------------------------
    [INFO] BUILD SUCCESS
    [INFO] ------------------------------------------------------------------------
    [INFO] Total time: 5.255s
    [INFO] Finished at: Mon Sep 16 13:20:13 EDT 2013
    [INFO] Final Memory: 13M/155M
    [INFO] ------------------------------------------------------------------------
    $
TIP
Do not run the script directly in the tools folder because that is where your project will be created."
Looking at the Project Structure
Before changing the layout, let's take a look at the different resources that a plugin project can provide. The project contains the following types of resources:
HTML Templates: these are Wicket HTML templates that define the mark-up that will be used when rendering pages. One of the advantages of using Wicket is that templates are 100% HTML.
Resource Bundles: these are special properties files that contain all the internationalized messages used by the UI. Each bundle contains files to support different languages.
Static resources: Images, Stylesheets, Scripts, Html files, etc. These resources are normally referenced from the branded pages.
The following resources are reserved for advanced usage, most projects don’t have to deal with them:
Java Components: It is possible to provide specific behaviour by creating custom Wicket components that can extend or replace those provided by JOSSO.
Branding Definition descriptor: This is a Spring XML file containing the branding extension information. (beans-ui.xml)
Plugin Project Descriptor, (pom.xml) Maven project descriptor.
HTML Templates structure
JOSSO provides several HTML templates that are combined to create an HTML page that's rendered to the user. The rules to combine the templates are those imposed by Apache Wicket. For instance, the HTML templates used to render the login screen are:
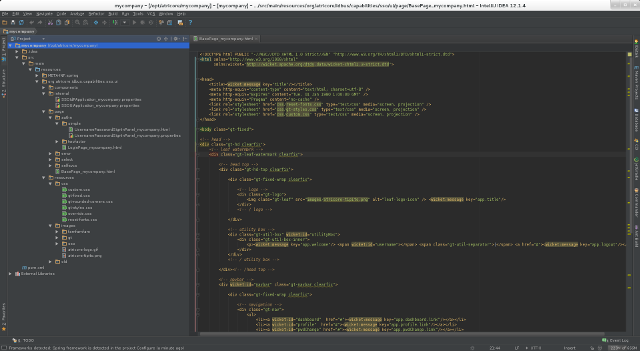
BasePage.html: it acts as a basic abstract page that's inherited by specific pages.
LoginPage.html: Default login page for all authentication schemes that require user interaction (basic, two-factor, etc.).
UsernamePasswordSignInPanel.html: Specific HTML template used for basic authentication: username and password, this template is embedded in the LoginPage.html following Wicket rules.
Any JOSSO Branding can overwrite the default HTML templates by simply creating a new one, using the template base name and adding the branding skin as a suffix (see descriptor definition below). For instance, if the template that needs to be overwritten is BasePage.html, the new file in our plugin project should be named BasePage_mycompany.html. You must put the new template on the same package/folder that contains the original version. The suffix will be part of the branding definition in the branding descriptor (i.e. 'mycompany'). To facilitate things, your project has already been created with all the HTML templates you'll need. The template value is actually the default UI, so you can alter just those that you need to modify.
Basic Set of Templates
If you’re looking to update the login form and standard error pages only you should probably work on the following HTML templates:
BasePage_mycompany.html: General layout for all pages
LoginPage_mycompany.html: Base page for all login authentication mechanism
UsernamePasswordSignInPanel: Panel for basic authentication (username/password)
AppErrorPage_mycompany.html: General UI error page
IDbusErrorPage_mycompany.html: General platform error page
SessionExpiredPage_mycompany.html: Information displayed when session expired
Resource Bundles
With Wicket, you can add resource bundles with messages that will be used by all pages, or by specific pages/components. You’ll find that some components have specific resource bundle files. These resources can be overridden just like HTML pages. To provide your own SSOUIApplication.properties resources, just create a properties file including the skin suffix as part of the name: SSOUIApplication_mycompany.properties.
Internationalization
It is possible to use Wicket internationalization support. For that you can create resource files for each language/country. The way to name the resources is as follows:
Resource_mycompany.properties (default, skin mycompany)
Resource_en_US_skin.properties (language English, country United States, skin mycompany)
Resource_US_skin.properties (country United States, skin mycompany)
Resource_en_skin.properties (language english, skin mycompany)
Based on the browser's locale information, JOSSO will match the file closest to it to render messages. If no match can be found the default will be used.
Making Changes to the UI
Now that we know how project resources are organized, let's make some changes. As stated before, JOSSO's UI is based on Apache Wicket. You can change anything on the HTML templates and replace them with your own HTML code; as long as you keep those tags that have a Wicket attribute configured. These are usually just a few tags on each page that represent input fields, forms, etc. You can change any attributes on these tags provided that Wicket attributes remain unmodified. You can also add your own images, stylesheets and any other resource you require.
Let's start by changing the application name, title and the company logo.
Set the Company Logo
To set a new company logo image we will copy the new file (mycompany-logo.png) to the images folder inside the project: mycompany/src/main/resources/org/atricore/idbus/capabilities/sso/ui/resources/images.
All static resources must be placed under mycompany/src/main/resources/org/atricore/idbus/capabilities/sso/ui/resources and then referred from HTML templates using a path relative to that folder. For example, in our case the image tag should look like this:
<img class="gt-leaf" src="./branding/mycompany-logo.png" alt="leaf-logo-icon" />
Changing the Application Title
Now that we've managed to add a new resource, and to modify the base HTML template, let's change the application title and name. As we saw before, JOSSO branding UI supports internationalization. This means that all texts displayed to the user are stored in resource bundles. You can then have a different bundle file, one for each supported language. To change the application name and title, open the following resource bundles located at: mycompany/src/main/resources/org/atricore/idbus/capabilities/sso/ui/internal
SSOIdPApplication_mycompany.properties
SSOUIApplication_mycompany.properties
Now, simply change the property value for app.title and title entries. The files should look like this:
title=My Company
app.title=SSO Service by My Company
The way to refer to these messages from within HTML templates is by using the Wicket tag message. If you look at the BasePage_mycompany.html file you will find the following element:
<wicket:message key="app.title"/>
Using your own HTML templates
You may also want to take your current HTML code and use it in your branding plugin. You just need to break down your templates into fragments that match the current structure: Base page, login page, username panel, etc. You can then replace the HTML found in the default templates, but you must keep all the elements that have a Wicket-id attribute. These are normally forms, input fields, and some tags about current user, therefore they should be easy to integrate into your own layout.
Remember, once you have the new templates you must add the Wicket attributes to any HTML tags that require them. You cannot eliminate an HTML tag that has a Wicket-id attribute configured; so make sure to port them to your layout.
Deploying the Plugin
The Build Process
The created project can be built using Apache Maven. If your IDE has Maven support, you can use it to import and build the project. You can also build it using Maven's command line utility. Just open a command line window and access the project folder. Then run Maven to create and build the plugin. The resulting artifact will be placed in the target folder of your project.
In Windows systems
    C:\atricore> cd mycompany
    C:\atricore\mycompany> mvn install
    [INFO] Scanning for projects...
    [INFO]
    [INFO] ------------------------------------------------------------------------
    [INFO] Building mycompany 1.0.0
    [INFO] ------------------------------------------------------------------------
    [INFO]
    [INFO] --- maven-resources-plugin:2.6:resources (default-resources) @ mycompany ---
    [WARNING] Using platform encoding (UTF-8 actually) to copy filtered resources, i.e. build is platform dependent!
    [INFO] Copying 1122 resources
    [INFO]
    [INFO] --- maven-compiler-plugin:2.3.2:compile (default-compile) @ mycompany ---
    [INFO] No sources to compile
    [INFO]
    [INFO] --- maven-resources-plugin:2.6:testResources (default-testResources) @ mycompany ---
    [INFO] Not copying test resources
    [INFO]
    [INFO] --- maven-compiler-plugin:2.3.2:testCompile (default-testCompile) @ mycompany ---
    [INFO] Not compiling test sources
    [INFO]
    [INFO] --- maven-surefire-plugin:2.15:test (default-test) @ mycompany ---
    [INFO] Tests are skipped.
    [INFO]
    [INFO] --- maven-bundle-plugin:2.1.0:bundle (default-bundle) @ mycompany ---
    [INFO]
    [INFO] --- maven-install-plugin:2.4:install (default-install) @ mycompany ---
    [INFO] Installing C:\atricore\mycompany\target\mycompany-1.0.0.jar to C:\Users\atricore\.m2\repository\com\mycompany\sso\mycompany\1.0.0\mycompany-1.0.0.jar
    [INFO] Installing C:\atricore\mycompany\pom.xml to C:\Users\atricore\.m2\repository\com\mycompany\sso\mycompany\1.0.0\mycompany-1.0.0.pom
    [INFO]
    [INFO] --- maven-bundle-plugin:2.1.0:install (default-install) @ mycompany ---
    [INFO] Installing com/mycompany/sso/mycompany/1.0.0/mycompany-1.0.0.jar
    [INFO] Writing OBR metadata
    [INFO] ------------------------------------------------------------------------
    [INFO] BUILD SUCCESS
    [INFO] ------------------------------------------------------------------------
    [INFO] Total time: 5.618s
    [INFO] Finished at: Mon Sep 16 16:11:52 EDT 2013
    [INFO] Final Memory: 13M/312M
    [INFO] ------------------------------------------------------------------------
In Unix systems
    $ cd /opt/atricore/mycompany
    $ mvn install
    [INFO] Scanning for projects...
    [INFO]
    [INFO] ------------------------------------------------------------------------
    [INFO] Building mycompany 1.0.0
    [INFO] ------------------------------------------------------------------------
    [INFO]
    [INFO] --- maven-resources-plugin:2.6:resources (default-resources) @ mycompany ---
    [WARNING] Using platform encoding (UTF-8 actually) to copy filtered resources, i.e. build is platform dependent!
    [INFO] Copying 1122 resources
    [INFO]
    [INFO] --- maven-compiler-plugin:2.3.2:compile (default-compile) @ mycompany ---
    [INFO] No sources to compile
    [INFO]
    [INFO] --- maven-resources-plugin:2.6:testResources (default-testResources) @ mycompany ---
    [INFO] Not copying test resources
    [INFO]
    [INFO] --- maven-compiler-plugin:2.3.2:testCompile (default-testCompile) @ mycompany ---
    [INFO] Not compiling test sources
    [INFO]
    [INFO] --- maven-surefire-plugin:2.15:test (default-test) @ mycompany ---
    [INFO] Tests are skipped.
    [INFO]
    [INFO] --- maven-bundle-plugin:2.1.0:bundle (default-bundle) @ mycompany ---
    [INFO]
    [INFO] --- maven-install-plugin:2.4:install (default-install) @ mycompany ---
    [INFO] Installing /opt/atricore/mycompany/target/mycompany-1.0.0.jar to /home/atricore/.m2/repository/com/mycompany/sso/mycompany/1.0.0/mycompany-1.0.0.jar
    [INFO] Installing /opt/atricore/mycompany/pom.xml to /home/atricore/.m2/repository/com/mycompany/sso/mycompany/1.0.0/mycompany-1.0.0.pom
    [INFO]
    [INFO] --- maven-bundle-plugin:2.1.0:install (default-install) @ mycompany ---
    [INFO] Installing com/mycompany/sso/mycompany/1.0.0/mycompany-1.0.0.jar
    [INFO] Writing OBR metadata
    [INFO] ------------------------------------------------------------------------
    [INFO] BUILD SUCCESS
    [INFO] ------------------------------------------------------------------------
    [INFO] Total time: 5.618s
    [INFO] Finished at: Mon Sep 16 16:11:52 EDT 2013
    [INFO] Final Memory: 13M/312M
    [INFO] ------------------------------------------------------------------------
    $
As you can see, the target folder contains the plugin distribution file: mycompany-1.0.0.jar
Deploying the branding plug-in
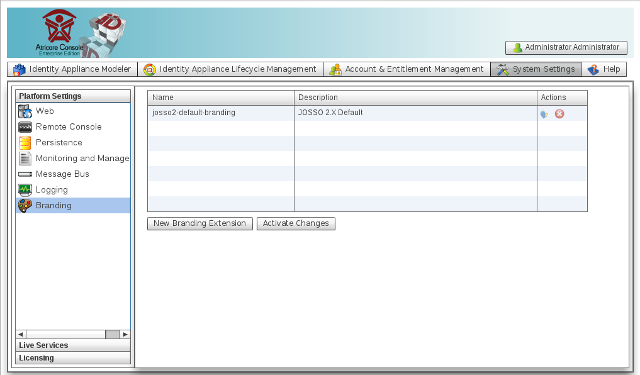
Once we’ve built our plugin, we need to deploy it in our JOSSO server instance. In order to do that, we need to access the Atricore Web Console and open the Branding Management facility. Simply go to System Settings and then select the Branding option on the left menu. You’ll see that there's already a branding definition there. It is JOSSO 2 default branding, this is a built-in definition that can’t be removed or changed.
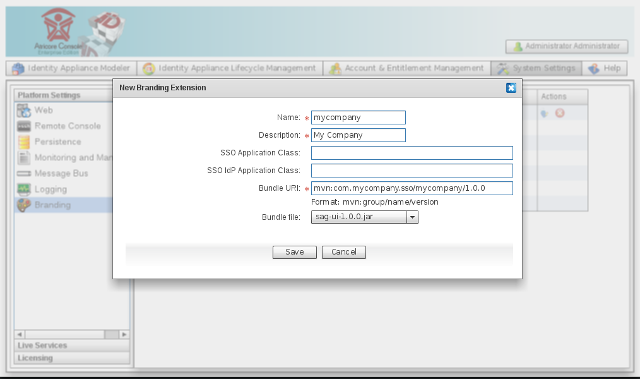
To add a new definition for our plugin, just click the New Branding Extension button. In the next window, you have to enter the following information:
| Property | Description |
| Name | The extension name, which MUST match the ui-id used while creating the project, in our case mycompany. |
| Description | The branding description, which will be used when showing the available brandings on your appliance definitions. We’ll use My Company. |
| SSO Application Class (optional) | This is used only in special cases when we want to use our own application component. We’ll leave it blank for this tutorial. |
| SSO IdP Application Class (optional) | This is used only in special cases when we want to use our own application component. We’ll leave it blank for this tutorial. |
| Bundle URI | This is the URI that identifies our plugin. The value MUST match the following pattern: mvn:[group-id]/[ui-id]/[version] In our case, the proper value would be mvn:com.mycompany.sso/mycompany/1.0.0. |
| Bundle file | The file containing our plugin. It can be found in the project's target folder; in our example it can be found at one of these locations (depending on your platform): c:\atricore\mycompany\target\mycompany-1.0.0.jar /opt/atricore/mycompany/target/mycompany-1.0.0.jar |
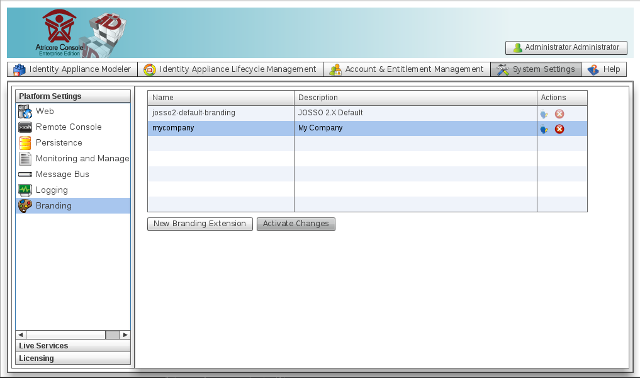
Once the Branding Extension has been created, we need to activate the changes. This step deploys the installed plugin and makes it available for running appliances.
TIP
Keep in mind that the activation process will restart ALL running appliances.
Use the branding extension in your appliance
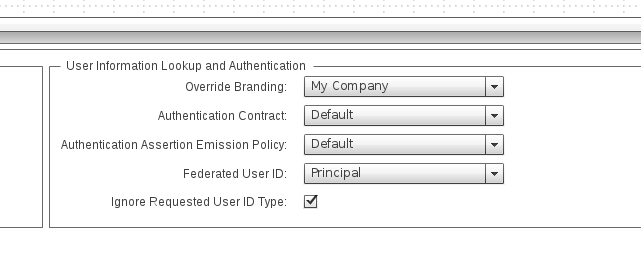
The last step is to refer to the new branding definition from your Identity Appliance. Since JOSSO supports multiple branding extensions, you can specify which one you want to use at the appliance or identity provider levels. To change the branding for the appliance in general, select the appliance element (root element on the left tree) and set the Branding option to My Company. To change the branding for the Identity Provider (authentication screen, etc), select the Identity Provider element and set the Override Branding option to My Company
Now you need to save the app again. The next time you sign in you will see the new logo and title.
TIP
Undeploying and rebuilding the appliance is only required when you change the branding definition you are using. If you keep working your plugin all you need to do is to deploy the new plugin file and activate the changes from the branding management facility"