High Availability
There are multiple alternatives when enabling High Availability in JOSSO. Some are more complex than others, and selecting which is the best for you will depend on your requirements. The main goal is to keep the identity services working even in the event of hardware or software failure in one of the JOSSO servers, but like in any HA solution, ALL components must provide HA capabilities, especially user repositories (DB and Directory servers) and partner applications. Otherwise, a single point of failure will still exist. In all cases, it is up to the deployer to keep SSO Nodes updated with the corresponding configuration and identity appliance definitions. JOSSO will not propagate configuration changes performed to a node.
This tutorial focuses on how to configure Clustering support in JOSSO; enabling HA support in external components is outside the scope of this document.
Following is a brief overview of the different alternatives, including pros and cons for each one.
Non-Replicated Cluster
Non-replicated clusters provide a highly scalable and easy to configure alternative. In a non-replicated cluster you configure two or more server groups or units, where each unit contains a JOSSO server and application container instances. An HTTP load balancer will forward incoming traffic to one of the groups, ensuring that any subsequent request from a given user will always be forwarded to a server in the same group or unit. If any of the servers on a unit fails, the load balancer will consider the group down, and will forward traffic to another group. This approach has the advantage of being easy to set up and maintain, and it does not require replication for JOSSO, or for the SSO partner applications. The disadvantage is that when a group goes down, users lose the current state, and they need to sign in again once they are automatically reassigned to a new group. Application state is also lost, but the service will still be available.
Let’s take a look at an example with two SSO clusters, each containing a JOSSO server and an application server.

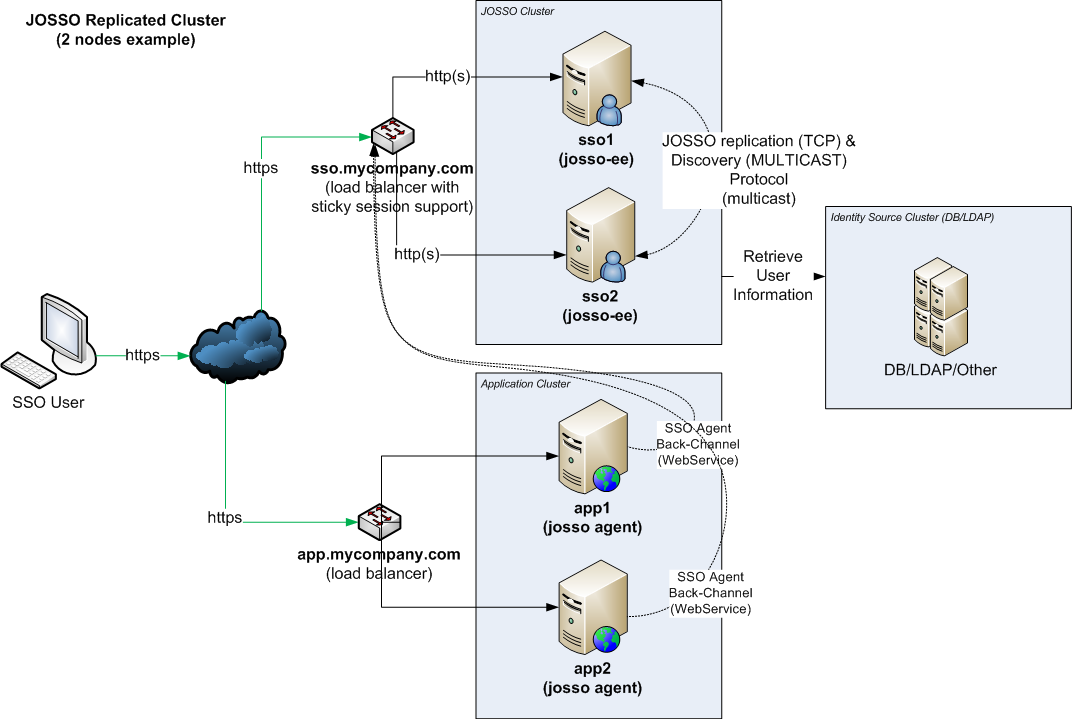
Replicated Cluster
In a replicated cluster, user state is shared among multiple servers, ensuring that, upon node failure, state will be maintained in other servers. It requires replication not only on the JOSSO tier, but also at the application level, to be effective. Partner applications using JOSSO agents must use a load-balancer to resolve web-service calls targeted to JOSSO servers, allowing for applications to keep working even if one of the SSO servers goes down.
This approach requires that partner applications already support replication, and it also makes configuration and maintenance of the solution more complex. The advantage is that if any of the servers goes down, users will continue to operate the system without losing state.
Following is a diagram describing a hypothetical clustered deployment with a single partner application. If more applications are involved, they will be added as other application clusters.
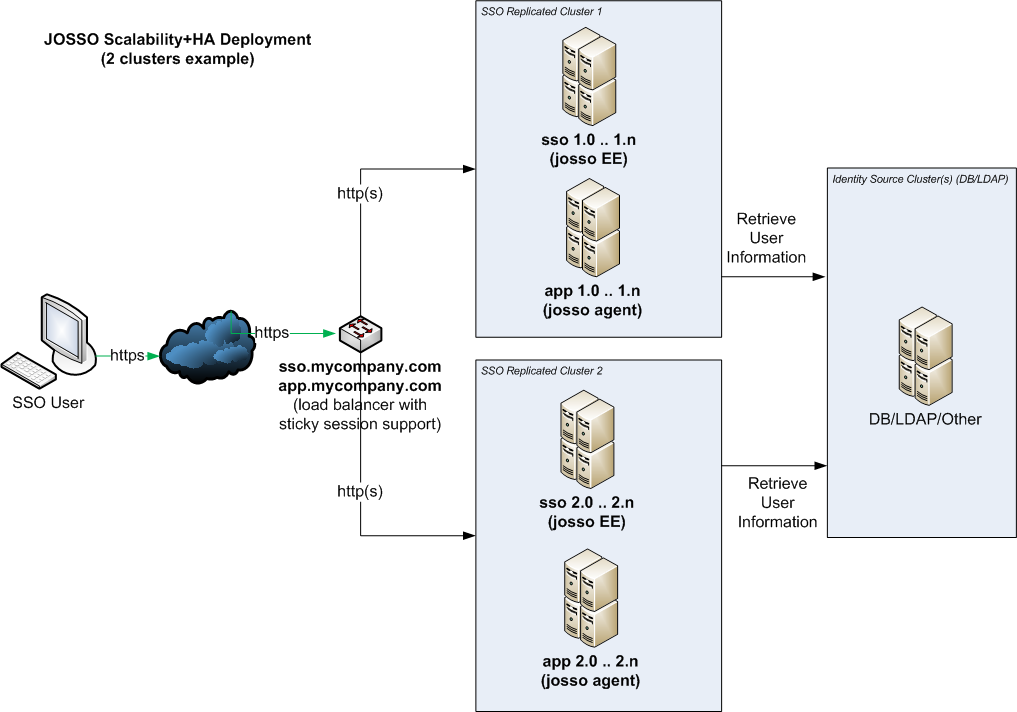
Mixing Both Options
It is possible to combine both approaches, you can define multiple independent groups or units like in the first example, but in this case each group is actually a replicated cluster (normally two servers of each kind: sso, application, etc.). This ensures that groups will be always available, but also makes scaling simpler. All that is needed to augment the processing capacity is to add an additional group to the solution.
This approach requires a complex setup, combining load-balancers and replication settings for JOSSO and the partner applications, but it permits adding unlimited number of clustered-groups to the solution.
Here's an example of this type of deployment:
Getting Started
We are going to follow the steps required to configure the two scenarios described above. These are the assumptions and prerequisites. Creating a mixed scenario is simply combining the other two examples. We are also using a single application, but adding more is just a matter of repeating the configuration steps for the new elements.
In the examples, we use JOSSO Agent-based partner applications, but other applications like cloud services or third-party products supporting any SSO protocol (i.e. SAML 2, OpenID Connect, OAuth, Ws-Federation, etc) can also be used.
Prerequisites
JDK 7 or 8
JOSSO 2.4.1 (Update #25 or above)
Load Balancer: Apache Web Server 2.4 (with Proxy support: mod_proxy)
Application Server: Apache Tomcat 7
Partner Application: JOSSO Sample application
User Repository: JOSSO Built-in
Environment Details
| Property | Cluster 1 | Cluster 2 |
|---|---|---|
| Load Balancer Internal Host | sso-lb.local | sso-lb.local |
| Load Balancer SSO Host | sso.mycompany.com | sso.mycompany.com |
| Load Balancer Application Host | sso.mycompany.com | sso.mycompany.com |
| JOSSO Internal Hosts | sso1.local | sso2.local |
| Tomcat Server Internal Hosts | app1.local | app2.local |
| Node ID | idbus-001 | idbus-002 |
Scenario 1 - Non-Replicated Cluster
When using this type of cluster, there are two configuration steps to perform. First, we need to modify the SSO Agent configuration file and point the backchannel endpoint (webservices) to the corresponding internal SSO server. Agents cannot use the public SSO server name and go through the load-balancer to the wrong SSO node when invoking webservices. We may also need to disable SSL for the endpoint, especially if the reverse proxy/load balancer is handling the SSL termination.
JOSSO Agent Configuration
Let’s take a look at the changes made to the agent configuration created by JOSSO. Look for the following properties:
 <property name="endpoint">
     <value>sso.mycompany.com:443</value>
 </property>
 <property name="transportSecurity">
     <value>confidential</value>
 </property>
Remove the transportSecurity property and update the endpoint property’s value. The value will vary from one application server instance to another. For example, for application server node one app1.local, the endpoint to use is sso1.local:8081, but for application server node two app2.local, it will be sso2.local:8081. As you can see, you must pair each application node with the corresponding SSO server.
<property name="endpoint">
    <value>sso1.local:8081</value>
</property>
Load Balancer Configuration
The key to getting non-replicated clusters to work is to have the proper load-balancer configuration. We must ensure that when a user has been assigned to SSO node one, they are also assigned to the corresponding application node one. Let’s take a look at a possible configuration using Apache Load Balancer.
In this example, a domain cookie generated by Apache is used to keep track of the CLUSTER to which a user has been assigned. Make sure that JOSSO server 1 (sso1.local) and Application server 1 (app1.local) are associated to the the same CLUSTER/ROUTE id, the same applies to sso2.local and app2.local servers. If a domain cookie cannot be used (JOSSO and the applications do not share a common domain), you may consider enabling stickyness based on the user’s IP address.
It is also important to enable the ProxyPreserveHost directive for auditing purposes.
Below is the relevant aspect of the Apache server configuration:
ProxyRequests Off
ProxyPreserveHost On
SSLProxyVerify none
SSLProxyProtocol all

# Domain-wide cookie to keep track of the Cluster ID (will be available to sso.mycompany.com and app.mycompany.com)
Header add Set-Cookie "CLUSTERID=.%{BALANCER_WORKER_ROUTE}e; Domain=.mycompany.com; path=/" env=BALANCER_ROUTE_CHANGED

# app1 and sso1 user route id 1
# app2 and sso2 user route id 2

# JOSSO Load balancer Setup
<Proxy balancer://sso>
BalancerMember http://sso1.local:8081 route=1
BalancerMember http://sso2.local:8081 route=2
ProxySet stickysession=CLUSTERID
</Proxy>

# JOSSO Proxy rules (no need to specify the host in our case)
ProxyPass /IDBUS balancer://sso/IDBUS
ProxyPassReverse /IDBUS balancer://sso/IDBUS

ProxyPass /IDBUS-UI balancer://sso/IDBUS-UI
ProxyPassReverse /IDBUS-UI balancer://sso/IDBUS-UI

# Application Load balancer Setup
<Proxy balancer://app>
BalancerMember http://app1.local:8080 route=1
BalancerMember http://app2.local:8080 route=2
ProxySet stickysession=CLUSTERID
</Proxy>

# Application Proxy rules (no need to specify the host in our case)
ProxyPass /partnerapp balancer://app/partnerapp
ProxyPassReverse /partnerapp balancer://app/partnerapp
The provided configuration is for demonstration purposes only, and may not apply to your environment or load-balancer solution. Providing LB specific options is outside the scope of this document.
JOSSO Server Configuration
No special configuration is required on the JOSSO side, both nodes will have a copy of the exact same identity appliance. Like in any other proxied scenario, Providers' locations will always use public URLs starting with https://sso.mycompany.com, and application resource definitions will follow the same principle, in this case starting with https://app.mycompany.com.
Let’s take a look at our current identity appliance:

Starting the Cluster
Now that everything has been configured, you can start all the elements on the cluster.
Scenario 2 - Replicated Cluster
In this scenario, applications and JOSSO must have replication enabled, otherwise user state will be lost if any of the resources fail. Enabling replication at the application level is outside the scope of this document, and depends on the application type and container.
With a replicated cluster there is no need to match the application servers with SSO servers, allowing for other sticky session support strategies. In this example, we will use the non-clustered setup as a starting point, making the necessary changes to enable JOSSO replication.
JOSSO Agent Configuration
We want agents to use a load balancer when issuing web-services requests to JOSSO. This ensures that if an SSO node goes down, another will be able to handle the requests. In our case we will use an internal host to refer to the load balancer, but the service will be the same Apache server.
This is the endpoint property after making the necessary changes. In this case we also removed the transportSecurity property from the agent configuration file.
 <property name="endpoint">
     <value>sso-lb.local:80</value>
 </property>
Make sure that the load balancer can be contacted by application servers on the required port. You may want to use an internal load balancer for this purpose, since it does not have to be the same used for user incoming connections from users.
Load Balancer Configuration
In this case, we don’t need a domain-wide cookie to provide sticky session support. We can mix SSO nodes with application nodes. We do want to use sticky session support for each resource type (SSO, applications). Let’s take a look a the new load balancer configuration:
ProxyRequests Off
ProxyPreserveHost On
SSLProxyVerify none
SSLProxyProtocol all all

# ROUTEID cookie is server specific (not domain wide)
Header add Set-Cookie "ROUTEID=.%{BALANCER_WORKER_ROUTE}e; path=/" env=BALANCER_ROUTE_CHANGED

# In this example, this balances browser and sso agent requests
<Proxy balancer://sso>
BalancerMember http://sso1.local:8081 route=1
BalancerMember http://sso2.local:8081 route=2
ProxySet stickysession=ROUTEID
</Proxy>

ProxyPass /IDBUS balancer://sso/IDBUS
ProxyPassReverse /IDBUS balancer://sso/IDBUS

ProxyPass /IDBUS-UI balancer://sso/IDBUS-UI
ProxyPassReverse /IDBUS-UI balancer://sso/IDBUS-UI


<Proxy balancer://app>
BalancerMember http://app1.local:8080 route=1
BalancerMember http://app2.local:8080 route=2
ProxySet stickysession=ROUTEID
</Proxy>

ProxyPass /partnerapp balancer://app/partnerapp
ProxyPassReverse /partnerapp balancer://app/partnerapp
JOSSO Server Configuration
JOSSO uses EHCache internally to replicate user information. The replication protocol is based on RMI (Java Remote Method Invocation). By default JOSSO nodes will automatically discover other peers using MULTICAST. This provides an automatic method of nodes discovery, simplifying cluster maintenance significantly. It is possible to manually configure the list of peers. In our example we’re using MULTICAST, but we will also provide instructions on how to set up a white-list node discovery.
In this case, every time a node is added to the cluster, the information already contained in the running servers will automatically be propagated to the new node upon startup.
In order to enable replication in JOSSO we need to perform the following configuration changes:
Enable HA Support
This requires the activation of the HA feature. We need to edit the file $JOSSO2_HOME/etc/org.apache.karaf.features.cfg and modify the featuresBoot property, replacing josso-ee with josso-ee-ha at the end of the line:
featuresBoot=atricore-branding,config,ssh,management,spring,spring-dm,atricore-monitoring-builtin,atricore-auditing-builtin,josso-ee-ha
Peer Discovery Configuration
EHCache provides two out of the box peer discovery mechanisms: automatic and manual. The first one is based on TCP MULTICAST and allows JOSSO to automatically discover new peers using multicast messages. This option makes it easier to add and remove new nodes to the cluster, since no list is required on each node.
The second option: manual does not use MULTICAST, but it is far too complex to be useful due to how EHCache implements it, and how JOSSO creates caches in the system.
JOSSO adds a third option: dynamic that allows you to specify the list of hosts that are part of a cluster. JOSSO will dynamically discover and share identity appliances and providers' states among these nodes.
The following configurations will show how to set up each option in our example:
Automatic Peer Discovery
This is the default HA configuration, so there is no need to make changes to the ehcache-ha.xml file.
Let’s take a look at the configuration for our current example:
    <!-- Discover Cache peers using RMI Multicast -->
    <cacheManagerPeerProviderFactory
            class="net.sf.ehcache.distribution.RMICacheManagerPeerProviderFactory"
            properties="peerDiscovery=automatic,
                        multicastGroupAddress=230.0.0.1,
                        multicastGroupPort=4446,
                        timeToLive=0"
            propertySeparator=","
            />
Dynamic Peer Discovery
Edit the ehcache-ha.xml file (JOSSO2_HOME/etc), and make sure that the correct Peer Provider Factory component is configured: Do not include the current node as part of the list.
| Property | Value |
|---|---|
| peerDiscovery | dynamic (only works with IdBusRMICacheManagerPeerProviderFactory component) |
| remoteHosts | List of host:port pairs, pointing to remote nodes. The port must match the value used in the port property of the cacheManagerPeerListenerFactory component defined in the same file (default 40001). |
Let’s take a look at the configuration for our current example:
    <!-- Discover Cache peers using RMI host:port list  -->
    <cacheManagerPeerProviderFactory
            class="org.atricore.idbus.bundles.ehcache.distribution.IdBusRMICacheManagerPeerProviderFactory"
            properties="peerDiscovery=dynamic,
                        remoteHosts=sso2.local:40001"
            propertySeparator=","
            />
Set Up Node Information
Now we need to identify each node with its own ID, edit the file $JOSSO2_HOME/etc/org.atricore.idbus.kernel.main.cfg and set the corresponding value to the idbus.node property. In this case we are using idbus-001 for SSO server one, and idbus-002 for SSO Server two. In the same file, you also need to enable the binding.soap and binding.http properties, as shown below. These properties control the number of attempts and retry delays for a node that requires information from another server.
idbus.node=idbus-002

...

# This is useful in cluster environments
binding.http.loadStateRetryCount=5
binding.http.loadStateRetryDelay=100

# This is useful in cluster environments
binding.soap.loadStateRetryCount=5
binding.soap.loadStateRetryDelay=100
Identity Appliance Configuration
No special configuration is required on the JOSSO side, both nodes will have a copy of the exact same identity appliance. Like in any other proxied scenario, Provider locations will always use public URLs starting with https://sso.mycompany.com, and application resource definitions will follow the same principle, in this case starting with https://app.mycompany.com.
Let’s take a look at our current identity appliance (it is the same we used in the previous scenario):
Starting the Cluster
Now that everything has been configured, you can start all the elements on the cluster. It is recommended to wait for the first SSO Node to get started before starting the others.
Conclusion
There are other configuration alternatives. This document is intended to provide an initial overview that should help you deploy the solution that better meets your needs. As you can see, one of the critical aspects is to fully understand the HTTP protocol and to know the capabilities that load-balancers have to offer.